
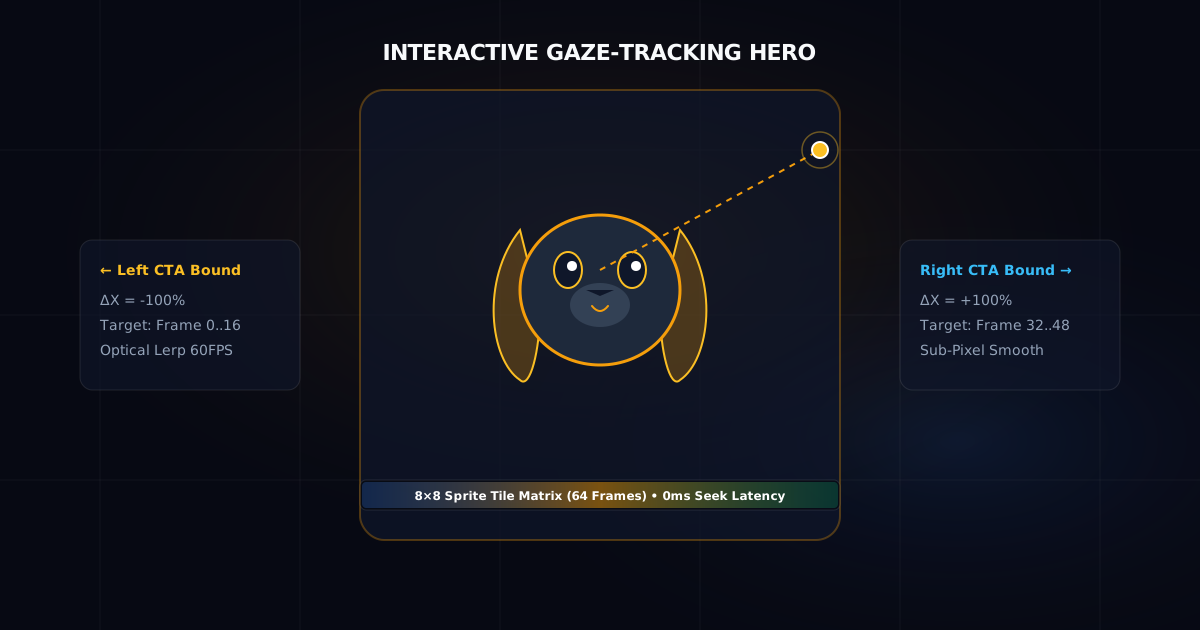
The Illusion of 3D Without 3D Overhead
Building high-fidelity interactive 3D characters for web hero sections usually involves a grueling pipeline: modeling and rigging in Blender, exporting multi-megabyte glTF/GLB assets, loading Three.js, configuring custom PBR shaders, and debugging performance bottlenecks on low-end mobile hardware.
The video-scrubbing sprite matrix technique bypasses this overhead completely. By generating a controlled head-and-eye sweep using modern video AI and scrubbing frames through a 60 FPS canvas engine with damped physics, you achieve Pixar-grade character responsiveness with 0ms seek latency and a featherweight ~1.2 MB footprint.
Key Technical Wins
- 0ms Interaction Latency: Zero decode buffering by sampling an in-memory 2D GPU sprite tile.
- 60–120 FPS Eased Inertia: Sub-pixel damping (linear interpolation) gives organic character physics.
- Mobile Gyroscope Integration: Real-time device orientation tilts the character as the phone moves.
- Living Idle Glance Loop: Autonomous micro-glances prevent the page from feeling static when idle.
The End-to-End Pipeline
The system is built in four distinct stages:
- Character Synthesis: Generating a locked studio portrait via Google ImageFX / Imagen 3.
- Constrained Sweep Generation: Generating a controlled gaze video via Google VideoFX / Veo.
- Optical Flow Interpolation & Packing: Using FFmpeg
minterpolateto create an 8×8 tile grid. - Interaction Engine: Computing relative-to-container boundary vectors with 3D perspective tilt in Vanilla JavaScript.
Step 1: Base Character Prompting
To avoid geometry jumping between poses, the base character must have high contrast, a solid minimalist studio background, and a dead-center camera angle.
A hyper-cute golden retriever puppy sitting upright in the center, facing the camera
with big expressive eyes, fluffy fur, warm soft studio lighting, clean solid pastel
minimalist studio background, high quality 3D Pixar Disney style character rendering,
locked camera angle, centered composition.
Step 2: Constrained Motion Video Generation
When generating the motion in an Image-to-Video tool (such as Google VideoFX, Veo, Luma, or Kling AI), the prompt must explicitly lock the torso and background to prevent body breathing or camera drift:
Use the uploaded image as the exact character reference. Keep the camera completely
locked with no zoom, pan, tilt, or background motion.

The puppy remains sitting in the exact same spot. Animate only the puppy's head, eyes,
and ears moving slowly and smoothly:
1. The puppy slowly turns its head to look toward the far left.
2. It slowly pans its gaze back through center.
3. It slowly looks toward the far right with a subtle head tilt.
4. Finally, it smoothly returns to the exact starting center pose.

Keep the torso, paws, and background completely still. Slow motion, high fidelity.
Why Not Just Generate a Sprite Sheet Directly with an Image Model?
A natural architectural question arises: Why introduce a video generation model at all? Couldn't an advanced image model (like Gemini, Imagen 3, or Midjourney) generate a $3\times3$ or $4\times4$ sprite grid directly in a single prompt?
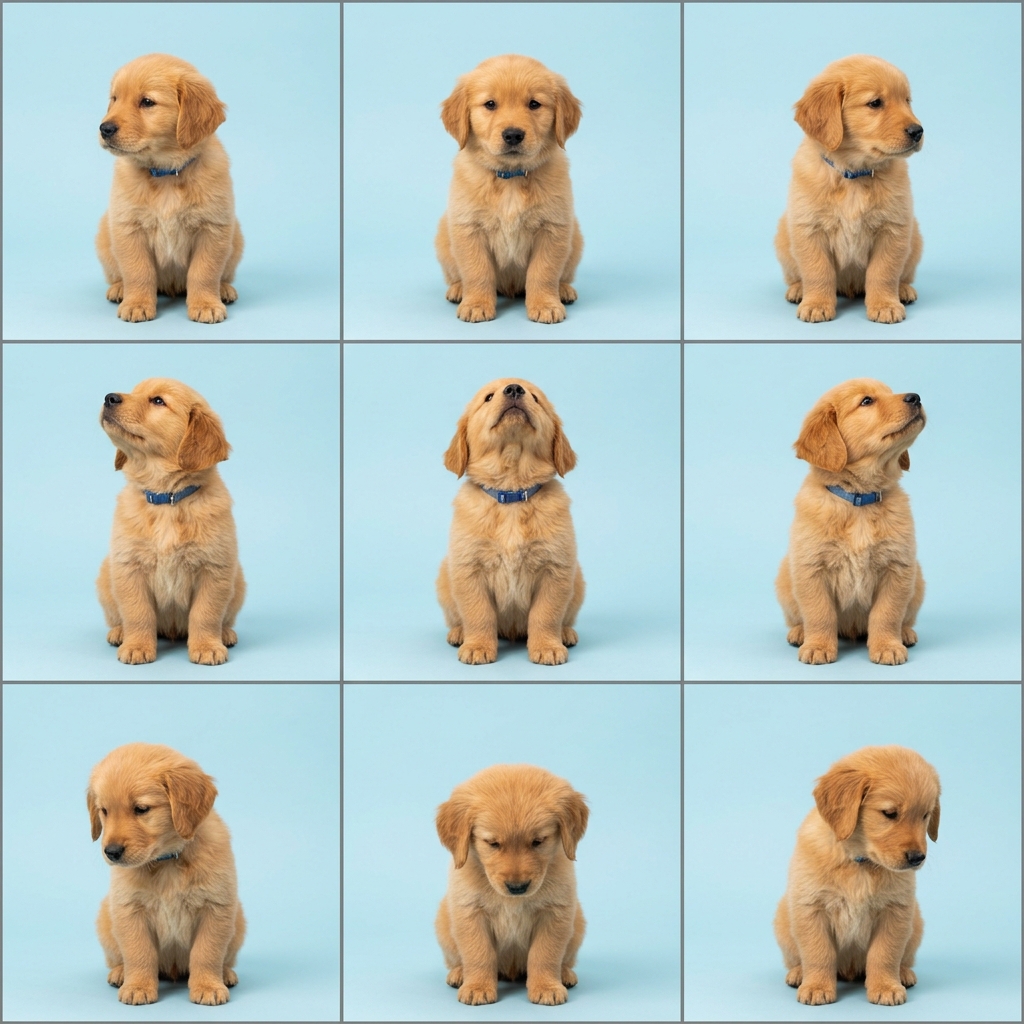
We tested direct $3\times3$ grid prompting. While it works well for simple icons or retro games, comparing it against the Image-to-Video pipeline reveals four fundamental technical differences for interactive web heroes:
| Metric | Direct Image Sprite Grid | Image-to-Video Pipeline (Veo / VideoFX) |
|---|---|---|
| Frame Density | 3–4 frames per sweep (feels like discrete clicks/stepping). | 40–80+ dense frames (delivers continuous 60–120 FPS fluid motion). |
| Identity & Texture | Drifts across cells: Collar buckle, fur texture, and ear shape mutate between tiles. | 100% Locked: Temporal attention layers preserve the exact same pixel texture across time. |
| Posture Alignment | Jitters: Torso height, paw placement, and floor plane shift slightly per tile. | Stationary: The body and floor remain anchored while only the gaze turns. |
| Secondary Physics | None (static captured poses). | Organic inertia (ear bounce, eye lead-in, head tilt). |
When to Use Which Approach
- Use Direct Image Sprite Generation: For retro pixel-art games, 3-state UI toggles (e.g. blink/smile on form input), or 2.5D depth-map mesh morphing.
- Use Image-to-Video + Sprite Packing: For photorealistic hero sections where a character must smoothly follow cursor gaze across 1,000+ pixels of screen space with zero jitter.
Step 3: 60 FPS Optical Interpolation & 2D Grid Assembly
Raw AI video is typically rendered at 24 FPS with only ~11 frames devoted to each directional turn. To achieve silky motion without discrete frame steps, we run FFmpeg bidirectional optical flow (minterpolate):
ffmpeg -i puppy_raw.mp4 \
  -filter:v "minterpolate='fps=60:mi_mode=mci:mc_mode=aobmc:me_mode=bidir:vsbmc=1'" \
  puppy_interpolated_60fps.mp4
Why 2D Grid Tiling Beats Horizontal Strips
A horizontal strip of 64 high-res frames is $64 \times 480\text{px} = 30,720\text{px}$ wide — easily exceeding browser GPU canvas texture limits (typically 4,096px or 8,192px on mobile Safari and Chrome). Packing frames into an $8 \times 8$ grid yields a standard $3840 \times 3840\text{px}$ texture that compiles instantly across all mobile GPUs:
ffmpeg -y -i puppy_interpolated_60fps.mp4 \
  -vf "fps=8,scale=480:480:force_original_aspect_ratio=increase,crop=480:480,tile=8x8" \
  -q:v 2 \
  puppy_spritesheet.jpg
Step 4: Real-Time Vector Math in Vanilla JS
Rather than tracking raw screen pixels, we calculate the cursor vector relative to the character's eye position ($(\Delta X, \Delta Y)$) and normalize against the boundaries of the container:
const center = this.getCharacterCenter();
const heroRect = this.heroContainer.getBoundingClientRect();

const dx = clientX - center.x;
const dy = clientY - center.y;

// Exact container bounds from the puppy's face to the edges
const distToLeftEdge = Math.max(1, center.x - heroRect.left);
const distToRightEdge = Math.max(1, heroRect.right - center.x);
const distToTopEdge = Math.max(1, center.y - heroRect.top);
const distToBottomEdge = Math.max(1, heroRect.bottom - center.y);

// Normalization: Exactly -100% on left CTA edge and +100% on right CTA edge
const normX = dx < 0
  ? Math.max(-1, dx / distToLeftEdge)
  : Math.min(1, dx / distToRightEdge);

const normY = dy < 0
  ? Math.max(-1, dy / distToTopEdge)
  : Math.min(1, dy / distToBottomEdge);
Avoiding Common Visual Pitfalls
1. Eliminating Alpha-Blend Ghosting
Attempting to smooth frame transitions by cross-fading adjacent frames with ctx.globalAlpha creates a severe double-exposure effect whenever the mouse pauses. The superior approach is crisp nearest-frame selection driven by continuous floating-point damped physics (lerp). The eye perceives 60 FPS motion without any transparency blur.
2. Curating Clean Pose Sequences
AI video models sometimes generate minor artifacts (like ears briefly perking up or twitching). By cataloging an explicit array of clean pose indices (e.g. leftPoses = [0..16] and rightPoses = [32..48]) anchored to the exact same center frame (0), crossing $\Delta X = 0$ is 100% glitch-free.
Mobile & Sensor Adaptations
On mobile touchscreens, there is no mouse cursor. We solve this with three complementary features:
- Gyroscope Device Orientation:
window.DeviceOrientationEventtranslates physical phone tilt ($\pm 25^\circ$) directly into gaze vectors. - Living Idle Glance Loop: When the page is untouched for 4 seconds, randomized micro-glances keep the character naturally animated.
- CTA Attentive Focus: Hovering or tapping CTA buttons causes the character to turn and look directly at that specific button.
Try the Gaze-Tracking Hero Live
Experience the 60 FPS interactive character yourself: move your cursor across the CTAs, tilt your mobile phone, or tap to see the puppy track your gaze in real-time.
Launch Interactive Demo