What this article covers
- The problem with words alone
- A timer takes too much or too little
- Telling a new slide from a moving face
- Watching only the part that holds the slides
- Watch a part, keep the whole
- One window, not the whole screen
- Photos from a phone, by their clock
- Exports that keep the pictures in place
- Reading the attendees from a screenshot
- What stays private
- What I would tell someone building this
Part 3 of 7 in the Building ZumiScribe series. Try ZumiScribe, free in your browser.
The problem with words alone
Read back the transcript of almost any online presentation and you will find sentences that point at something you cannot see. "This number here." "The second column." "As the chart shows." The words are right, but they depend on a picture that the transcript does not have.
The obvious fix is to put the pictures in the transcript. ZumiScribe already shows the transcript as a chat of speech bubbles, one per speaker turn, so the natural place for a picture is under the bubble that was being spoken when it was on screen. Every picture, whatever its source, ends up as an attachment on a bubble: a thumbnail you can click for the large view.
It started with pasting: take a screenshot with the system shortcut, press Ctrl or Cmd+V, and the picture goes on the selected bubble (or the newest). Pictures are shrunk to at most 1,600 pixels on the long side and stored inside the transcript file, so they travel with it. But pasting asks you to remember, and in a meeting the moment to grab a slide passes quickly. So the next question was how the app could take the pictures itself.
A timer takes too much or too little
When you share a browser tab, the screen or an app with ZumiScribe (for its sound), the page also receives a picture of it. That makes a snapshot cheap: Snapshot now, or Alt+S, puts a picture of the shared tab or app on the selected bubble, or the newest one.
For automatic snapshots the first idea is a timer, and ZumiScribe has one (every 30 seconds up to every 5 minutes). But a presenter who spends ten minutes on one diagram gets it over and over, and one who clicks through five slides in a minute gets one of them. The timer skips a picture when the screen has not changed since the last one kept, which stops the repeats but not the misses.
The more useful mode is new slides: take a picture each time a new slide appears. That sounds simple. Saying what counts as "new" turned out to be most of the work.
Telling a new slide from a moving face
A webinar screen is rarely still: camera tiles move, captions change, a chat scrolls. Compare two pictures pixel by pixel and the screen is always "new". Here is what the code does. Every 2 seconds it takes a small copy of the shared picture (240 pixels across) and splits it into a grid of 24 by 14 blocks. For each block it measures how much it changed since the last look: the average, over its pixels, of the largest step in red, green or blue. A block counts as changed when that average is above 6 on a scale of 0 to 255, which slide text is well above.
Each block also learns how often it changes. One that keeps changing (a camera, captions, a clock) becomes "busy" and is left out of the decision. Among the quiet blocks that remain, a new slide is when two things are true:
- It has stopped moving. If more than about 3% of the quiet blocks are still changing between looks, the slide is still animating in, and the app waits. Otherwise you would get a picture of half a slide.
- It is different enough. At least about 4% of the quiet blocks must differ from the pictures kept lately.
That word "lately" came from a fix. In the first version a new slide was compared only with the last picture kept. A presenter who went back to an earlier slide to answer a question got that slide again in the transcript. A day later the app remembered the last six pictures kept, and a slide only counts as new if it differs from all of them.
The same day brought a duller fix that mattered as much. Taking a picture can fail (the shared tab stops sending pictures, the app has no window on screen). Now, after three failures in a row, it says why once, tries only every 30 seconds, and carries on by itself when pictures come back.
Watching only the part that holds the slides
Learning which blocks are busy helps, but it is a guess, and a guess takes time to settle. A gallery of six cameras along the top of a webinar is a lot of moving blocks. Someone who keeps their camera still for a minute and then waves can look, briefly, like a slide change.
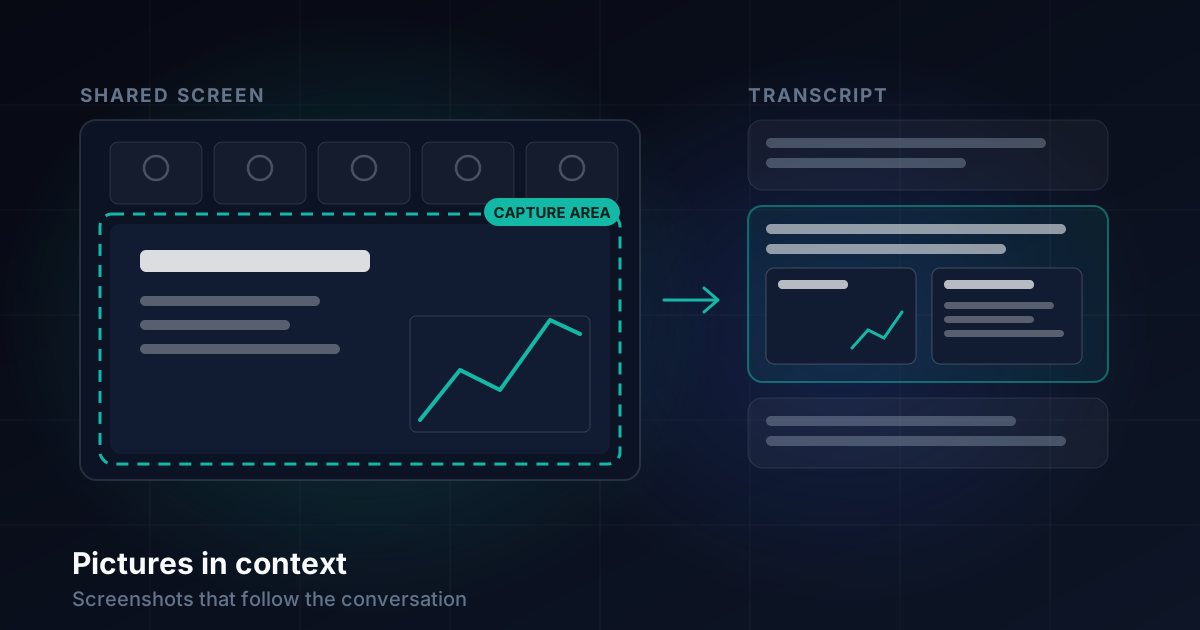
So the second big change was to ask. The capture area says which part of the shared screen holds the slides, and only that part is watched. The people, cameras and chat outside it can change as much as they like.
In the start steps you choose a layout, each with a small drawing:
- Whole screen (which warns that the people and chat may make it think a slide changed)
- Slides left, people right
- Slides right, people left
- Slides below a strip of people
- Slides above a strip of people
- Centre of the screen
If none fits, Draw an area... opens a screen with a blue box to drag and resize, and a box for a name. A drawn area is kept in the browser to use again (and can be forgotten with its ×). During a recording, the Area button opens the same box over a picture of the screen as it is now, which is the easiest way to get it right.
The area is stored as fractions of the picture (0 to 1), so it survives a window being resized. It does not survive a change of layout: if the meeting app switches view, the area needs drawing again. When the area changes, what the app had learnt about busy blocks is thrown away, because it was learnt for a different part of the screen. The area is saved with the recording, in its file, as captureArea.
Watch a part, keep the whole
One decision here was easy to get wrong. If you only watch the slide area, it is tempting to keep only the slide area too: a neat crop of each slide.
ZumiScribe does not do that. The area decides when to take a picture; the picture kept is always the whole screen. The reason is that the rest of the screen is often useful later. It shows who was speaking, who was presenting, what was in the chat at that moment. A crop throws that away, and you cannot get it back.
Where a picture goes matters as much as when it is taken. A manual snapshot goes where you point (the selected bubble, or the newest). An automatic one goes on the bubble being spoken at the moment the picture was taken, whatever is selected. Pictures taken before anyone has said anything wait, up to the latest ten, and go on the first bubble once there is one.
One window, not the whole screen
A browser can only see what you share with it. On a Mac, the ZumiScribe Local app fills the gap for desktop apps: with "An app on this Mac" as the source, snapshots are of that one app's window, and each keeps the window's title so you can see later where it came from.
Photos from a phone, by their clock
Not everything happens on a screen. At a lecture or an in-person meeting, the useful pictures are often photos of a whiteboard taken on a phone. The "Student at a lecture" recording type takes no screenshots at all and is set up for exactly this.
With each recording kept in a folder of its own (the default when you choose a folder), you put the photos in that folder by AirDrop, a synced folder or a cable, and press Load images. Each picture goes on the bubble being spoken when it was taken, using the camera's own time stamp, or the file's time when there is none. The transcript keeps a small thumbnail; the full picture stays in the folder and shows in the large view. Pressing it again only adds new ones.
This went wrong on the first day: the first version placed pictures by the wrong time field. It was fixed the same day, but "the time a photo was taken" is less simple than it sounds.
The harder case is a phone whose clock is wrong. Then every photo is off by the same amount, often far enough to fall outside the recording altogether. Pictures taken more than half an hour outside the recording are listed, and you choose: leave them, add them to one bubble, or shift their times. You type how far the clock was off, as minutes or hours (5, -3, 90, 1h30), and they are placed again. One number fixes the whole set, because the error is the same for all of them.
Exports that keep the pictures in place
A transcript with pictures is only half useful if the pictures fall out when you export it. Two exports keep them: Document with pictures (PDF) and Word document (.docx). Both ask what to include: times, the summary, the pictures and attachments, and your private notes (off by default). In both, each picture sits under its bubble, shrunk to fit the page; pictures loaded from the folder are used at full quality.
Both are built on your computer. The PDF opens as a printable page in a new window and you save it from the print dialog; the Word file is assembled in the page and downloaded. Nothing is uploaded.
Reading the attendees from a screenshot
Pictures also help before a recording starts. ZumiScribe uses the attendee list to match voices to names, and the easiest place to find that list is often on screen: a calendar event, or the participants list in a meeting app. So in the setup dialog you can paste a screenshot (Ctrl or Cmd+V), drop one on the list, or press Read a screenshot..., and the title and the people are read from it.
The reading is done on your computer. It uses Chrome's own text reader when that is switched on; otherwise it asks first and downloads Tesseract.js once (about 10 MB). The picture never leaves the computer.
The first version was poor on real screenshots. A real calendar or meeting window has columns, chips and toolbars, and reading it as ordinary text ran them together into nonsense. Two fixes, made the same day, made the difference: read the picture as sparse text, word by word, and drop words read with low confidence; and enlarge a small screenshot before reading it, because text about 20 pixels high is read much better at twice the size.
The rest is filtering. Menu words, buttons, dates, links and email addresses are not taken as names, and a person's name is never taken as the title. Names it could not read cleanly are listed so you can type them in.
What stays private
Pictures are treated like notes. They are kept in the saved transcript, but never written to the text exports (Markdown, plain text, SRT, WebVTT), never sent to phones following along through the relay (only text is sent there), and never sent to a web address. They appear in a PDF or Word export only when you make one, and that export asks whether to include them.
What I would tell someone building this
Ask the person where to look. The first version tried to learn which parts of the screen were noise. Learning still helps, but a picker with small drawings removed most of the problem in one step. The person can see the layout; the code has to guess it.
Decide when and what separately. Watch the slide area; keep the whole screen. One is for the decision, the other is the record.
Remember more than the last picture. Presenters go back to earlier slides.
Expect clocks to be wrong, and screenshots to be messy. One offset fixes a whole set of photos. Text recognition that works on a clean sample can fall apart on a busy window.
Limitations
Slide detection is a set of thresholds, not understanding. A slide that changes very little (one new bullet point in a corner) may fall under the "different enough" line; a video playing inside the slide area will look busy. The capture area has to be drawn again if the meeting app changes layout. Automatic snapshots need a shared tab, screen or (on a Mac with the app) an app window: with the microphone alone there is no picture to take. Photos with no camera time stamp fall back to the file's time, which may be when it was copied rather than when it was taken. And text read from a screenshot needs checking.
Transcripts that know who said what
Live captions, speaker labels, pictures in context and summaries, in your browser. There is no ZumiScribe server: transcripts stay in your browser or your own folder, and you choose which transcriber hears the audio, including ones that run on your own computer.
Try ZumiScribe